Setting up ExpressJS MongoDB project
This post goes through how to setup expressJS and mongoDB with examples
Are you tired of using structured databases like MySQL and SQLite? Want to try something new and exciting? Look no further than MongoDB! In this blog post, we'll be setting up a backend using Express.js and MongoDB.
I will be using the project that my team worked on, called lazzzy-space, as an example. You can find the source code for the project on GitHub. lazzy-space
Basics information about Express.js and MongoDB
What is MongoDB?
MongoDB is a document-oriented NoSQL database. It is a cross-platform, open-source database that stores data in JSON-like documents. It is a non-relational database, which means that it does not use tables and rows to store data. Instead, it uses collections and documents.
What is Express.js?
Express.js is a web application framework for Node.js. It is a minimal and flexible Node.js web application framework that provides a robust set of features for web and mobile applications.
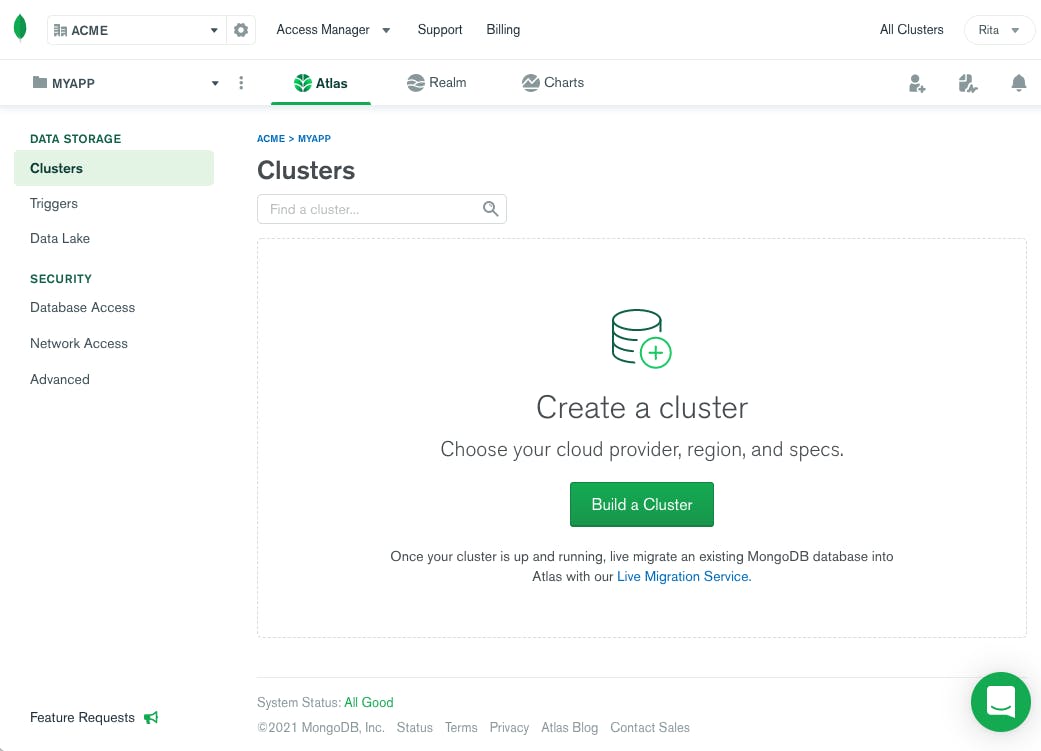
Setting up MongoDB Atlas Cluster
Now that we have installed the required packages, we need to set up a MongoDB Atlas cluster. MongoDB Atlas is a fully managed cloud database service that hosts MongoDB databases. It is a cloud-based database service that is free to use for small projects. To set up a MongoDB Atlas cluster, go to https://www.mongodb.com/cloud/atlas and sign up for an account. Once you have signed up, you will be taken to the MongoDB Atlas dashboard. Click on the "Build a Cluster" button to create a new cluster.
On the next page, you will be asked to select a cloud provider and region for your cluster. Select the cloud provider and region of your choice and click on the "Create Cluster" button.
Creating a Node.js project
Once you have those installed, let's create a new project directory and initialize it as a Node.js project. In your terminal, navigate to the directory
you want to create the project in and run npm init -y. This will create a package.json file, which is essential for managing your project's dependencies.
Setting up Express.js, MongoDB and Mongoose
First, we need to install Express.js and MongoDB. We'll also be using Mongoose, which is an Object Data Modeling (ODM) library for MongoDB and Node.js.
npm install express mongoose mongodbCreate an env file
Now that we have set up our MongoDB Atlas cluster, we need to create an env file. Create a file called ".env" in the root directory of your project. In this file, we will store our MongoDB connection string. Paste the connection string you copied from MongoDB Atlas into the .env file.
MONGO_URI=<your-mongo-connection-string>Creating the Express.js server
Now that we have installed the required packages, we can create our Express.js server. Create a file called server.js in the root directory of your project.
To use the .env file we created earlier, we need to install the dotenv package. Run npm install dotenv to install the package. Now, we can import the
dotenv package into our server.js file.
And for cookies, we will be using the cookie-parser package. Run npm install cookie-parser to install the package. Now, we can import the cookie-parser
package into our server.js file.
const express = require('express')
const mongoose = require('mongoose')
require('dotenv').config()
const cookieParser = require('cookie-parser')

const app = express()
const PORT = process.env.PORT || 5000

app.use(express.json())
app.use(cookieParser())

//Listen through PORT only if mongoDB connection is `open`
mongoose.connection.once('open', () => {
  console.log('Connected to MongoDB')
  app.listen(PORT, () => console.log(`Server running on port ${PORT}`))
})
Connecting to MongoDB
To connect to our MongoDB cluster, we will create a file called config\db.js in the config directory of our project. In this file, we will connect to our MongoDB
cluster using the connection string we stored in our .env file. We will also be using the mongoose package to connect to our MongoDB cluster.
const mongoose = require('mongoose')
const mongoose = require('mongoose')

const connectDB = async () => {
  try {
    await mongoose.connect(process.env.DATABASE_URI, {
      useUnifiedTopology: true,
      useNewUrlParser: true,
    })
  } catch (err) {
    console.error(err)
  }
}

module.exports = connectDB
Now, we need to import the connectDB function into our server.js file and call it. This will connect to our MongoDB cluster.
const connectDB = require('./db')

connectDB()config\allowedOrigins.js and config\corsOptions.js which are used to allow CORS and to set the allowed origins.So in allowedOrigins.js we have
const allowedOrigins = [
  'https://www.yoursite.com',
  'http://127.0.0.1:5000',
  'http://localhost:3500',
  'http://localhost:3000',
]

module.exports = allowedOrigins
And in corsOptions.js we have
const allowedOrigins = require('./allowedOrigins')

const corsOptions = {
  origin: (origin, callback) => {
    if (allowedOrigins.indexOf(origin) !== -1 || !origin) {
      callback(null, true)
    } else {
      callback(new Error('Not allowed by CORS'))
    }
  },
  optionsSuccessStatus: 200,
}

module.exports = corsOptions
Note: You can add more origins to the
allowedOriginsarray. This will provide a list of origins that are allowed to access your API. Which is important for security reasons.
server.js fileconst corsOptions = require('./config/corsOptions')
const allowedOrigins = require('./config/allowedOrigins')
app.use(cors(corsOptions))These layers of extra functions are called middleware. They are functions that have access to the request and response objects. They can be used to
modify the request and response objects before they are sent to the client. We will be using the cors package to enable CORS in our Express.js
server. Run npm install cors to install the package. Now, we can import the cors package into our server.js file.
Another example of middleware that we have used earlier were the express.json() and cookie-parser packages. These packages are used to parse the
request body and cookies respectively.
JWT Authentication for APIs
To take this to the next step, we will be adding JWT authentication to our API. This will allow us to authenticate users and restrict access to certain
routes. We will be using the jsonwebtoken package to create and verify JWTs. Run npm install jsonwebtoken to install the package.
We will create a middleware\verifyJWT.js file in the middleware directory of our project. In this file, we will create a middleware function that will verify
the JWT sent in the request header. If the JWT is valid, the user will be allowed to access the route. If the JWT is invalid, the user will be denied access
to the route.
const jwt = require('jsonwebtoken')

const verifyJWT = (req, res, next) => {
  const authHeader = req.headers.authorization || req.headers.Authorization
  //If there is not token send from request then status 401 unauthorized
  if (!authHeader?.startsWith('Bearer ')) {
    // console.log("hell")
    return res.sendStatus(401)
  }
  const token = authHeader.split(' ')[1]
  console.log(token)
  jwt.verify(token, process.env.ACCESS_TOKEN_SECRET, (err, decoded) => {
    if (err) return res.sendStatus(403) //invalid token
    req.username = decoded.username
    next()
  })
}

module.exports = verifyJWTcredentials.js which uses the allowedOrigins array to check if the origin of the request is allowed or not. If the origin is
not allowed, the request will be denied. If the origin is allowed, the request will be allowed to continue. This will take place before CORS is enabled.const allowedOrigins = require('../config/allowedOrigins')
const credentials = (req, res, next) => {
const origin = req.headers.origin
if (allowedOrigins.includes(origin)) {
res.header('Access-Control-Allow-Credentials', true)
}
next()
}
module.exports = credentialsverifyJWT function into our server.js file and use it as a middleware function. This will verify the JWT sent in the request
header before allowing the user to access the route. Also import the credentials middleware function and use it as a middleware function. This will
allow the user to access the route if the origin of the request is allowed.const verifyJWT = require('./middleware/verifyJWT')
const credentials = require('./middleware/credentials')
app.use(verifyJWT)
app.use(credentials)application/x-www-form-urlencoded.app.use(express.urlencoded({ extended: true }))Mongo DB Schema
mongoose package to create the schema.models directory in the root of your project. In this directory, we will create a User.js file. This file will contain the schema for our
users collection.const mongoose = require('mongoose')
const Schema = mongoose.Schema
const UserSchema = new Schema({
username: {
type: String,
required: false,
//unique: true,
},
fullname: {
type: String,
required: false,
},
password: {
type: String,
required: true,
},
email: {
type: String,
required: true,
//unique: true,
},
date: {
type: Date,
default: Date.now,
},
color: {
type: String,
required: true,
},
image: {
file: {
path: String,
},
},
boards: [
{
_id: false,
bid: {
type: String,
ref: 'boards',
},
isFavourite: {
type: Boolean,
default: false,
},
},
],
notification: [
{
notify_type: String,
boardName: String,
userName: String,
sendTime: String,
uid: String,
bid: String,
accept: String,
},
],
refreshToken: [String],
})
module.exports = User = mongoose.model('user', UserSchema)Breakdown of the schema
This will look confusing at first, but we will break it down one by one.
The username field is the username of the user. This field is not required. This field is not unique. This field is of type String.
The fullname field is the fullname of the user. This field is not required. This field is of type String.
The password field is the password of the user. This field is required. This field is of type String.
The email field is the email of the user. This field is required. This field is unique. This field is of type String.
The date field is the date when the user was created. This field is of type Date.
The color field is the color of the user. This field is required. This field is of type String.
The image field is the image of the user. This field is of type Object. This field has a file field which is of type Object. This field has a
path field which is of type String.
The boards field is an array of objects. This field is of type Array. This field has a _id field which is of type Boolean. This field has a bid
field which is of type String. This field has a isFavourite field which is of type Boolean.
The notification field is an array of objects. This field is of type Array. This field has a notify_type field which is of type String. This
field has a boardName field which is of type String. This field has a userName field which is of type String. This field has a sendTime field
which is of type String. This field has a uid field which is of type String. This field has a bid field which is of type String. This field has a
accept field which is of type String.
The refreshToken field is an array of strings. This field is of type Array. This field has a String field which is of type String.
Now, we need to create a Board.js file in the models directory. This file will contain the schema for our boards collection.
const mongoose = require('mongoose')
const Schema = mongoose.Schema

const BoardSchema = new Schema({
  title: {
    type: String,
    required: true,
  },
  lists: [
    {
      _id: false,
      list: {
        type: String,
      },
    },
  ],

  backgroundURL: {
    type: String,
  },

  members: [
    {
      _id: false,
      user: {
        type: String,
        ref: 'users',
      },
    },
  ],
})

module.exports = Board = mongoose.model('board', BoardSchema)
Important Note
ref field in the members field is the name of the collection that we want to reference. In this case, we want to reference the users collection.ref field in the boards field is the name of the collection that we want to reference. In this case, we want to reference the boards collection.Breakdown of the schema
The title field is the title of the board. This field is required. This field is of type String.
The lists field is an array of objects. This field is of type Array. This field has a _id field which is of type Boolean. This field has a list
field which is of type String.
The backgroundURL field is the background image of the board. This field is of type String.
The members field is an array of objects. This field is of type Array. This field has a _id field which is of type Boolean. This field has a
user field which is of type String.
Using these schemas, we can create the routes for our project. You can add more fields to the schema as per your requirements. And for the purpose of
this tutorial, we will be using the User.js and Board.js files.
Routes
Now, we will create the routes for our project. We will be using the express package to create the routes.
Create a routes directory in the root of your project. In this directory, we will create a api directory. In this directory, we will create a
auth.js file. This file will contain the routes for authentication. When a user registers or logs in, we will use these routes. Here we will use another
package called bcryptjs to hash the password. We will also use the jsonwebtoken package to generate the token for the user. We will also use the
config package to get the secret key for the token. Also we will be using multer package to upload the image of the user.
Let's start with uploading the image of the user. We will create a multer instance and export it. This instance will be used in the auth.js file.
Upload Image
const express = require('express')
const User = require('../../models/User')
const bcrypt = require('bcrypt')
const multer = require('multer')
const jwt = require('jsonwebtoken')

const router = express.Router()

const storage = multer.diskStorage({
  destination: function (req, file, cb) {
    cb(null, 'images')
  },
  filename: function (req, file, cb) {
    cb(null, new Date().toISOString() + file.originalname)
  },
})

const fileFilter = (req, file, cb) => {
  const fileTypesAllowed = ['image/jpeg', 'image/jpg', 'image/png']

  //check whether filetype allowed is acceptable
  if (fileTypesAllowed.includes(file.mimetype)) {
    cb(null, true)
  } else {
    cb(null, false)
  }
}

const upload = multer({
  storage: storage,
  limits: {
    fileSize: 1024 * 1024 * 5,
  },
  fileFilter: fileFilter,
})
Sign up route
POST route for registering the user.router.post('/signup', profile.single('pic'), async (req, res) => {
try {
//check if user already exist
const fetched_user = await User.find({
$or: [{ email: req.body.email }, { username: req.body.username }],
})
if (fetched_user.length != 0) {
console.log(fetched_user)
return res.status(500).json('User already exist')
}
if (req.file) {
const cryptsalt = await bcrypt.genSalt(10)
const hashedpass = await bcrypt.hash(req.body.password, cryptsalt)
const new_user = await new User({
email: req.body.email,
username: req.body.username,
password: hashedpass,
color: req.body.color,
image: {
file: {
path: req.file.path,
},
},
})
const result = await new_user.save()
res.status(200).json(result)
} else {
const cryptsalt = await bcrypt.genSalt(10)
const hashedpass = await bcrypt.hash(req.body.password, cryptsalt)
const new_user = await new User({
email: req.body.email,
username: req.body.username,
password: hashedpass,
color: req.body.color,
})
const result = await new_user.save()
res.status(200).json(result)
}
} catch (err) {
console.log(err)
res.status(500).json(err)
}
})Breakdown of the sign up route
multer instance to upload the image of the user. If the image is uploaded, we will create a new user with the image. If the image is
not uploaded, we will create a new user without the image.bcrypt package to hash the password. We will use the genSalt function to generate the salt. We will use the hash function to
hash the password. We will use the 10 as the salt rounds.color field to set the color of the user.save function to save the user to the database. If the user is saved successfully, we will return the user. If there is an error, we
will return the error.Login route
POST route for logging in the user.outer.post('/login', async (req, res) => {
try {
//Assuming there is old cookies
const cookies = req.cookies
const user = await User.findOne({
email: req.body.email,
})
!user && res.status(404).json('User not found')
const validPass = await bcrypt.compare(req.body.password, user.password)
!validPass && res.status(400).json('Wrong Password')
//Create the JWT
const accessToken = jwt.sign(
{
username: user.username,
},
process.env.ACCESS_TOKEN_SECRET,
{ expiresIn: '5m' }
)
//create refresh token
const refreshToken = jwt.sign({ username: user.username }, process.env.REFRESH_TOKEN_SECRET, {
expiresIn: '1d',
})
//If there is old refresh token
//eg: user goes to login without logging out
//we will delete the old refresh token
let newRefreshTokenArray = !cookies?.jwt
? user.refreshToken
: user.refreshToken.filter((rt) => rt !== cookies?.jwt)
if (cookies?.jwt) {
const Token = cookies.jwt
const foundToken = await User.findOne({ Token })
// Detected refresh token reuse!
if (!foundToken) {
// clear out ALL previous refresh tokens
newRefreshTokenArray = []
}
res.clearCookie('jwt', {
httpOnly: true,
sameSite: 'none',
secure: true,
})
}
// Add new refresh token to user
user.refreshToken = [...newRefreshTokenArray, refreshToken]
const result = await user.save()
//Send new refresh token
res.cookie('jwt', refreshToken, {
httpOnly: true,
sameSite: 'none',
secure: true,
maxAge: 24 * 60 * 60 * 1000,
}) // set secure to true when its in production
// Send authorization roles and access token to user
res.status(200).json({ result, accessToken })
} catch (err) {
console.log(err)
}
})Breakdown of the login route
bcrypt package to compare the password. We will use the compare function to compare the password. We will use the password from the
database and the password from the request body.accessToken and the refreshToken. We will use the sign function to create the token. We will use the ACCESS_TOKEN_SECRET and
the REFRESH_TOKEN_SECRET from the .env file. We will use the expiresIn to set the expiration time of the token.refreshToken array from the database.save function to save the user to the database.cookie function to set the cookie. We will use the httpOnly to set the cookie to be
accessible only by the web server. We will use the sameSite to set the cookie to be sent only in a first-party context. We will use the secure to set
the cookie to be sent only in HTTPS. We will use the maxAge to set the expiration time of the cookie.accessToken and the refreshToken to the user.Pro Tip: We will check for refresh token reuse. If the refresh token is reused, we will clear out all the previous refresh tokens. We will also clear the cookie. We will use the
clearCookiefunction to clear the cookie.
Logout route
POST route for logging out the user.router.post('/logout', async (req, res) => {
// On client, also delete the accessToken
const cookies = req.cookies
if (!cookies?.jwt) return res.sendStatus(204) //No content
const refreshToken = cookies.jwt
// Is user in db?
// If not, delete the cookie
const foundUser = await User.findOne({ refreshToken })
if (!foundUser) {
res.clearCookie('jwt', { httpOnly: true, sameSite: 'none', secure: true })
return res.sendStatus(204)
}
// Delete refreshToken in db
foundUser.refreshToken = foundUser.refreshToken.filter((rt) => rt !== refreshToken)
const result = await foundUser.save()
console.log(result)
res.clearCookie('jwt', { httpOnly: true, sameSite: 'none', secure: true })
res.sendStatus(200)
})
module.exports = routerBreakdown of the logout route
204 status code. If there is a refresh token, we will
check if the refresh token is in the database.findOne function to find the user. We will use the refreshToken from the cookie.clearCookie function to clear the cookie. We will use the
httpOnly to set the cookie to be accessible only by the web server. We will use the sameSite to set the cookie to be sent only in a first-party context.
We will use the secure to set the cookie to be sent only in HTTPS.save function to save the user to the
database.200 status code.So the three situations are:
If there is no refresh token, we will return204status code.If there is a refresh token but it is not in the database, we will clear the cookie and return204status code.If there is a refresh token and it is in the database, we will filter out the refresh token from the array and save the user to the database. We will clear the cookie and return200status code.
User route
We will now see some basic CRUD operations. We will create a user route. We will create a GET route to get all the users.
We will create a PUT route to update a user. We will create a DELETE route to delete a user. We have already seen
how to create a user through sign up.
user.js file in the routes folder to Get all the users.const express = require('express')
const router = express.Router()
const multer = require('multer')
const User = require('../models/User')
// GET user
router.get('/getuser', (req, res) => {
User.find()
.sort({ date: -1 })
.then((users) => res.json(users))
})GET route to get all the users. We will use the find function to find all the users. We will use the sort function to sort the users
by the date. We will use the date from the database. We will use the -1 to sort the users in descending order. We will use the then function to get the
users. We will use the json function to send the users as a JSON response.PUT route to update a user. This example is about updating the profile picture of the user.router.put('/:id', profile.single('pic'), async (req, res) => {
const updates = {
username: req.body.username,
image: {
file: '',
},
}
if (req.file) {
updates.image.file = req.file.path
}
try {
const user = await User.findByIdAndUpdate(req.params.id, updates, { new: true })
res.status(200).json('Profile Updated Succesfully')
} catch (e) {
return res.status(500).json(err)
}
})findByIdAndUpdate function to update the user. We will use the req.params.id to get the id of the user. We will use the updates to
update the user. We will use the new: true to return the updated user. We will use the json function
to send the updated user as a JSON response.GET route to get a user by id.// get user profile
router.post('/find_user', async (req, res) => {
try {
const users = await User.find()
matching_users = []
for (let i = 0; i < users.length; i++) {
const userId = users[i].id.slice(17)
if (userId === req.body.uid) {
matching_users.push(users[i])
}
}
res.status(200).json(matching_users)
} catch (err) {
res.status(500).json(err)
}
})find function to find all the users. We will use the for loop to loop through the users. We will use the slice function to get the last 17
characters of the id. We will use the if statement to check if the id is equal to the id from the request.push function to push the user to the matching_users array. We will use the json function to send the matching_users array as a JSON
response.DELETE route to delete a user.// delete user
router.delete('/:id', async (req, res) => {
try {
const user = await User.findById(req.params.id)
try {
await user.deleteOne()
res.status(200).json('User has been deleted...')
} catch (err) {
res.status(500).json(err)
}
} catch (err) {
res.status(500).json(err)
}
})findById function to find the user. We will use the deleteOne function to delete the user. We will use the json function to send the
message as a JSON response.Refresh token route
This route is to refresh the access token. We will create a refreshToken.js file in the routes folder.
router.get('/', async (req, res) => {
  const cookies = req.cookies
  // console.log(cookies.jwt)
  if (!cookies?.jwt) return res.sendStatus(401) //unauthorized
  const refreshToken = cookies.jwt
  // Delete after one use
  res.clearCookie('jwt', { httpOnly: true, sameSite: 'none', secure: true })

  //Detected refresh token that is reused again!!
  //handling token misuse
  const current_user = await User.findOne({ refreshToken })
  if (!current_user) {
    // console.log("don't have refresh", current_user)
    jwt.verify(refreshToken, process.env.REFRESH_TOKEN_SECRET, async (err, decoded) => {
      if (err) return res.sendStatus(403) //Forbidden
      // Delete refresh tokens of hacked user
      const hackedUser = await User.findOne({ username: decoded.username }).exec()
      hackedUser.refreshToken = []
      const result = await hackedUser.save()
    })
    return res.sendStatus(403) //Forbidden
  }

  const newRefreshTokenArray = current_user.refreshToken.filter((rt) => rt !== refreshToken)

  jwt.verify(refreshToken, process.env.REFRESH_TOKEN_SECRET, async (err, decoded) => {
    if (err) {
      //refresh token has expired handling.
      // console.log("Expired!!")
      current_user.refreshToken = [...newRefreshTokenArray]
      const result = await current_user.save()
    }
    // refresh token is wrong.
    // console.log(decoded.username)
    if (err || current_user.username !== decoded.username) {
      // console.log("I was here", newRefreshTokenArray)
      return res.sendStatus(403)
    }
    // Refresh token was still valid

    //set new accessToken
    const accessToken = jwt.sign({ username: decoded.username }, process.env.ACCESS_TOKEN_SECRET, {
      expiresIn: '5m',
    })
    //renew with new refresh token
    const newRefreshToken = jwt.sign(
      { username: current_user.username },
      process.env.REFRESH_TOKEN_SECRET,
      { expiresIn: '1d' }
    )

    current_user.refreshToken = [...newRefreshTokenArray, newRefreshToken]
    const result = await current_user.save()

    // Creates Secure Cookie with refresh token
    res.cookie('jwt', newRefreshToken, {
      httpOnly: true,
      sameSite: 'none',
      secure: true,
      maxAge: 24 * 60 * 60 * 1000,
    })

    res.json({ accessToken })
  })
})
That was a lot to take in, so let's break it down as simple as possible.
So first off, the main use of refresh token route, is so that there is a security layer, so that only authenticate users can access the protected routes. So every API call by the user, will have to go through the refresh token route, to get a new access token if the access token has expired. So the user will have to send the refresh token in the request, and the refresh token route will check if the refresh token is valid, and if it is valid, it will send a new access token to the user. So the user will have to send the new access token in the request, to access the protected routes.
This is how the refresh token route works. And it's a very simple concept, but it's very important to understand.
So let's break down the code.
refresh token. If it doesn't have the refresh token in the cookie, we will send a 401 status code, which means unauthorized.jwt cookie and store it in the refreshToken variable if it exists.jwt cookie, so that the refresh token can only be used once.findOne function to find the user with the refresh token. If the user doesn't exist, we will use the verify function to verify the refresh
token. If the refresh token is invalid, we will send a 403 status code, which means forbidden. Such situations can happen when the refresh token is stolen
by a hacker. So we will use the findOne function to find the user with the username from the refresh token and clear the refresh token array.filter function to filter out the refresh token from the array.verify function to verify the refresh token. There are 2 cases here.
save function to save the new refresh token array to the user.403 status code, which means
forbidden. This can happen when the refresh token is stolen by a hacker. So we will use the save function to save the new refresh token array to the user.sign function to sign the access token. We will use the json function
to send the access token as a JSON response.sign function to sign the refresh token. We will use the save function to save the new refresh token
to the user.cookie function to set the cookie. We will use the json function to send the
access token as a JSON response.Conclusion
Wow, that was quite the journey! We've covered everything from setting up a MongoDB Atlas cluster, to using Mongoose to cook up a user model, and even adding some middleware and routes to our ExpressJS backend.
But wait, there's more! Stay tuned for our next post where I'll show you how to create asynchronous API calls with axios, and top it off with a wrapper to access protected routes and use our refreshing refresh token route to get a new access token when the old one has expired.
Thanks for reading and I hope you found this information as satisfying as a warm bowl of your favorite soup. And don't hesitate to reach out to us with any questions, I're always happy to help!